I'm pretty good when it comes to electrics but I confess I don't know it all. Regulations have changed recently, and what used to be accepted practice has changed in recent years. Good then, to do a little R&D before attempting a job.
The van bodies are going to plug in using Commando connectors and as such have a similar hookup to a touring caravan on a campsite. Most pitches are provided with a weatherproof 13A socket or a Commando hookup and are protected by a RCD device. This is all well and good with a short run of interlink cable, but in our situation the extension from the Stone Barn is significantly longer.
A consequence of this is that the loop impedance (resistance) of a L-E or N-E fault is too high for a RCD to trip in the required time. The whole house protection of RCD's in the split-load consumer unit will protect the sockets in the barn, and will give an element of protection to the cable itself because we have separate MCB's in the barn, but at the other end of the cable, the situation is not so good.
The earth conductor in the 90m of extension simply isn't sufficient to protect against earth faults in the bodies.
Ah well. I'll need to implement what is known as a TT earthing system on the bodies themselves, protect the entire system with a separate RCD in each body and have separate protective earths at the body end of the link. The earth from the house, while sufficient to protect the cable itself from faults, won't handle the earthing correctly. Each body will need it's metalwork grounded using an earth spike as well as main bonding on the entire electrical system. Not an insurmountable issue, but to do it 'by the book' is going to cost another £50 or so per installation. On the upside, it does mean that when we go for a fully installed permanent supply, the systems will be compatible. Phew.
Monday, 1 December 2014
Sunday, 30 November 2014
Front Wall Finished
I bought three more shiplap planks and managed to finish the front exterior today. It still needs a couple more coats of stain and some sealing strips around the edges, but the construction work is complete. Solid as a solid thing, and looking good.

Next comes the internal cladding, but I'm putting the electrics in first so that I can chase the cables into the insulation before fixing the internal surface and sealing it all up.
A two-way consumer unit with 16A breaker for ring mains and 6A breaker for the lighting circuit has been fitted just inside the door and the incoming supply to the temporary socket needs to be fed via a kWh meter to the consumer unit so I can keep tabs on 'leccy usage and pay Eco for the power I use. I don't anticipate a huge amount of imported electricity as I shall have the solar panels for lighting and low consumption circuits.

I even fitted an exterior bulkhead light to illuminate the entrance and the area outside the door. I'm debating whether to fit an awning/porch over the front...I shall see how it goes once we get bad weather. For the moment, the exterior is as finished as it needs to be, bar the final staining.
Next comes the internal cladding, but I'm putting the electrics in first so that I can chase the cables into the insulation before fixing the internal surface and sealing it all up.
A two-way consumer unit with 16A breaker for ring mains and 6A breaker for the lighting circuit has been fitted just inside the door and the incoming supply to the temporary socket needs to be fed via a kWh meter to the consumer unit so I can keep tabs on 'leccy usage and pay Eco for the power I use. I don't anticipate a huge amount of imported electricity as I shall have the solar panels for lighting and low consumption circuits.
I even fitted an exterior bulkhead light to illuminate the entrance and the area outside the door. I'm debating whether to fit an awning/porch over the front...I shall see how it goes once we get bad weather. For the moment, the exterior is as finished as it needs to be, bar the final staining.
Friday, 28 November 2014
The Dihewyd Deli
I have just acquired an Andrew James food slicer. I've debated one for a while but the fact we can get a 1kg smoked gammon joint at Lidl for £3.99 and the fact that 100g of deli meat in Morribobs is £2.00 made a convincing arguement.
 It's a big beast.
 Post-roast gammon remains
 Sarnie meat
 Sarnie-thickness cooked ham. Delicious!
Thursday, 27 November 2014
Nearly...but not quite
Grrrr...I thought I was there today, I really did, but ended up being snookered by a schoolboy error.
Shiplap timber is rarer than hen's teeth in Jewsons. I think I had their last two random pieces back in July when I fettled a couple of planters for the garden, and they still haven't had fresh supplies in. Torn over where to source it, I considered Mount Trading in Aberystwyth or Huws Gray over at Bow Street, but was a bit reticent about carrying extra long loads for long distances at any speed on Pudgy's roof-bars. It then occured to me that there is a Travis Perkins in Lampeter, so I headed over that way this morning on the off-chance they might have some in,
Glory be, they did. In 4.2m lengths too, and I'd very carefully calculated that I could clad the entire surface area I needed to with six pieces 125mm wide. Only, I didn't allow for the overlap of about 20mm between two pieces, so I ended up a couple of planks short. Never mind - they have plenty more in stock so I'll scoop up a couple more at the weekend.
But, with what I did have to hand, I've done about 85% of the front wall!

Tada! An almost finished front wall. Ok, so I cheated with the camera angle, so you can just make out where I'm short in the bottom right hand corner.

A little trimming to do on the left of the door (and I need to take an angle-grinder to the tie thingy to the left of the door) and three more planks on the lower wall, and one final strip along the top and the flashing and it's all done.

It's had a wash-coat of thinned wood treatment to seal it, but once the final pieces are in place, it will get two more coats of exterior varnish, and look a bit more like antique pine.
Shiplap timber is rarer than hen's teeth in Jewsons. I think I had their last two random pieces back in July when I fettled a couple of planters for the garden, and they still haven't had fresh supplies in. Torn over where to source it, I considered Mount Trading in Aberystwyth or Huws Gray over at Bow Street, but was a bit reticent about carrying extra long loads for long distances at any speed on Pudgy's roof-bars. It then occured to me that there is a Travis Perkins in Lampeter, so I headed over that way this morning on the off-chance they might have some in,
Glory be, they did. In 4.2m lengths too, and I'd very carefully calculated that I could clad the entire surface area I needed to with six pieces 125mm wide. Only, I didn't allow for the overlap of about 20mm between two pieces, so I ended up a couple of planks short. Never mind - they have plenty more in stock so I'll scoop up a couple more at the weekend.
But, with what I did have to hand, I've done about 85% of the front wall!
Tada! An almost finished front wall. Ok, so I cheated with the camera angle, so you can just make out where I'm short in the bottom right hand corner.
A little trimming to do on the left of the door (and I need to take an angle-grinder to the tie thingy to the left of the door) and three more planks on the lower wall, and one final strip along the top and the flashing and it's all done.
It's had a wash-coat of thinned wood treatment to seal it, but once the final pieces are in place, it will get two more coats of exterior varnish, and look a bit more like antique pine.
Tuesday, 25 November 2014
Insulated and airtight
Today I picked up some foil-backed PIR board - Recticel Eurothane GP (which is pretty much the same as Kingspan or Celotex) - from Jewsons and stuffed and mounted it on the inner wall of the office.
Some Visqueen Gas sealing tape to seal the joins between the sections and a handful of screws to attach the insulation to the frame - job done!

I could just leave it as is...it's functional enough, but I want an inner cladding not only for strength but for a nice cosmetic finish. So now the frame is covered, it looks even more like a proper shed.
The insulation only took me a few hours, so the rest of my time was spent today getting rid of rubbish, sweeping the floor (it's got a lot of sawdust and trampled mud all over it), and generally sorting out tools and clearing up.
Come teatime, not only did we have a fabulous sunset in the West, but a red sky and rainbow in the East.

Sunset over the Cloud Forest - taken standing on an IBC to the back of the Storage Shed.

The view looking in the other direction, towards the East.
Some Visqueen Gas sealing tape to seal the joins between the sections and a handful of screws to attach the insulation to the frame - job done!
I could just leave it as is...it's functional enough, but I want an inner cladding not only for strength but for a nice cosmetic finish. So now the frame is covered, it looks even more like a proper shed.
The insulation only took me a few hours, so the rest of my time was spent today getting rid of rubbish, sweeping the floor (it's got a lot of sawdust and trampled mud all over it), and generally sorting out tools and clearing up.
Come teatime, not only did we have a fabulous sunset in the West, but a red sky and rainbow in the East.
Sunset over the Cloud Forest - taken standing on an IBC to the back of the Storage Shed.
The view looking in the other direction, towards the East.
Sunday, 23 November 2014
Put T' Wood In T' Hole!
Today I took the door over to the shed. The moment of truth...would it fit? Would I need to mullah the frame or the door? Well, it almost fitted from the get go! I just needed to trim the upper and lower parts of the door frame for height, and then I seasonally adjusted the door stop strips to adjust for the slight warp on the door. It may not be perfect, but it's more than good enough for me. Weathertight, windproof and secure.


The balance is pretty good too, and although I didn't actually check the door with a spirit level, there is no tendency for it to swing open or closed when ajar, so I think it went up pretty square.

From the outside, it still looks a little odd without the final cladding on the front, but I'm happy with the semi-rustic look. It fills the hole securely, keeps out the weather and with rubber sealing strips in place, it won't rattle in a Force 3 breeze.

Yes, it's beginning to look like an office. Even with just the breathable membrane covering the frame, inside with the door shut you can feel that the weather is being kept out. There is a noticeable difference between indoor and outdoor temperature, thanks to the translucent roof and the sunshine we had today.

From the rear of the body, the whole shebang is now starting to look pretty much as planned. You now get a feel of 'shed' rather than a feel of 'Nightfreight'. Once the internal framing has been insulated with Kingspan and clad, it should be a nice cosy enclosed space.
The door from the inside. Gapping round the door is approximately 1mm on each side, Close enough for ministry work and hopefully enough to allow just enough for expansion and contraction. I'm happy with the fit.
From the outside, it still looks a little odd without the final cladding on the front, but I'm happy with the semi-rustic look. It fills the hole securely, keeps out the weather and with rubber sealing strips in place, it won't rattle in a Force 3 breeze.
Yes, it's beginning to look like an office. Even with just the breathable membrane covering the frame, inside with the door shut you can feel that the weather is being kept out. There is a noticeable difference between indoor and outdoor temperature, thanks to the translucent roof and the sunshine we had today.
From the rear of the body, the whole shebang is now starting to look pretty much as planned. You now get a feel of 'shed' rather than a feel of 'Nightfreight'. Once the internal framing has been insulated with Kingspan and clad, it should be a nice cosy enclosed space.
Saturday, 22 November 2014
When is a door not a door? When it's ajar!
Well, I have had my eye on a couple of doors and I have been umm-ing and er-ing over which one I would finally choose. I did have my mind set on a glazed door and as I've put in a double-glazed window, I felt double glazing the door made sense. Without fart-arseing around trying to match a bare door to a double glazed panel, or vice versa, I decided on a ready made off the shelf pre-glazed baby. On the other hand, a basic timber door might look a little more 'shed-like' and will be a tad cheaper.
Today I looked at the two in my final shortlist at B&Q and tried to make a decision. Solid door or glazed door? Glazed door or solid door? In either case I would need to buy some door furniture so a set of hinges, a lock and catch and a set of handles were on the shopping list. Oh, and a tin of stain.
So what swung it? Four reasons. Firstly, the selection of glazed doors of the type I had considered were bloody heavy, at 44kg each. That is not only a heavy door for what is just a shed, but would need a potentially stronger frame and hinges than a lighter door choice. The unglazed door was a mere 25kg. Secondly, the glazed panel is larger than my window and wouldn't line up in an aesthetic manner. Thirdly, the glazed doors all seemed to have marks or dings on them from being shipped or handled - nothing major, but more work with the sandpaper and plastic wood. Fourthly, the basic solid door was £20 cheaper. I don't want to skimp on the project, but in the end the extra cost of a glazed door put me off. It may look a little 'plainer', but that's not a bad thing. I'm glad I put the window in now, though.
I've played with a couple of front doors, and I've rehung interior sapele or pine doors, but haven't 'built' an exterior door before. By that, I mean fitted hinges, chiselled out a rebate for the lock or trimmed it to fit an aperture. Fitting a complete framed double-glazed front door at a previous roost was simply a matter of beasting out the old door and frame, and then frame-fixing and sealing in the new one...a job for an afternoon.
Well, it wasn't a big deal. The lock came with paper templates and drilling details so half an hour with the drill, hammer and chisel saw that done, and test-fitting a pair of cheap handles (they need to come off again for staining) was the work of a couple of hours out in the garage tonight. I'm doing as much work 'off-site' as I can to minimise the fiddling about on-site.

The door (outside side). Tongue and groove pine, with an engineered frame and ledged and braced on the rear. I'm only using a cheap-ish Yale 3-lever lock rather than anything high security...we're in the middle of nowhere, so Fort Knox it doesn't need to be.

The handles are nothing fancy, just B&Q 'Value' at £6 a pair, but enough to be going on with. How well the brass flashing will stand up to the weather I wouldn't like to put money on, but they looked a little better than white plastic-coated or cast monkey-metal aluminium versions.
I still haven't made my mind up yet whether to hang the door so it opens inwards or opens outwards. Half of me says "it's a shed so open outwards" while the other half of me thinks it might be better from a prevailing wind point of view to have it open inwards. Visions of a Force 7 gale blowing through the Cloud Forest and ripping it out of my hands and off it's hinges spring to mind.
Opening out is going to be a little tricky right now as the level of the ground outside the door is a bit high, and may need scraping away, so I think what I might do is prepare hinge rebates both ways, so I can hang it opening inwards, and then change my mind later if an outward opener seems a better idea, later on.
Today I looked at the two in my final shortlist at B&Q and tried to make a decision. Solid door or glazed door? Glazed door or solid door? In either case I would need to buy some door furniture so a set of hinges, a lock and catch and a set of handles were on the shopping list. Oh, and a tin of stain.
So what swung it? Four reasons. Firstly, the selection of glazed doors of the type I had considered were bloody heavy, at 44kg each. That is not only a heavy door for what is just a shed, but would need a potentially stronger frame and hinges than a lighter door choice. The unglazed door was a mere 25kg. Secondly, the glazed panel is larger than my window and wouldn't line up in an aesthetic manner. Thirdly, the glazed doors all seemed to have marks or dings on them from being shipped or handled - nothing major, but more work with the sandpaper and plastic wood. Fourthly, the basic solid door was £20 cheaper. I don't want to skimp on the project, but in the end the extra cost of a glazed door put me off. It may look a little 'plainer', but that's not a bad thing. I'm glad I put the window in now, though.
I've played with a couple of front doors, and I've rehung interior sapele or pine doors, but haven't 'built' an exterior door before. By that, I mean fitted hinges, chiselled out a rebate for the lock or trimmed it to fit an aperture. Fitting a complete framed double-glazed front door at a previous roost was simply a matter of beasting out the old door and frame, and then frame-fixing and sealing in the new one...a job for an afternoon.
Well, it wasn't a big deal. The lock came with paper templates and drilling details so half an hour with the drill, hammer and chisel saw that done, and test-fitting a pair of cheap handles (they need to come off again for staining) was the work of a couple of hours out in the garage tonight. I'm doing as much work 'off-site' as I can to minimise the fiddling about on-site.
The door (outside side). Tongue and groove pine, with an engineered frame and ledged and braced on the rear. I'm only using a cheap-ish Yale 3-lever lock rather than anything high security...we're in the middle of nowhere, so Fort Knox it doesn't need to be.
The handles are nothing fancy, just B&Q 'Value' at £6 a pair, but enough to be going on with. How well the brass flashing will stand up to the weather I wouldn't like to put money on, but they looked a little better than white plastic-coated or cast monkey-metal aluminium versions.
I still haven't made my mind up yet whether to hang the door so it opens inwards or opens outwards. Half of me says "it's a shed so open outwards" while the other half of me thinks it might be better from a prevailing wind point of view to have it open inwards. Visions of a Force 7 gale blowing through the Cloud Forest and ripping it out of my hands and off it's hinges spring to mind.
Opening out is going to be a little tricky right now as the level of the ground outside the door is a bit high, and may need scraping away, so I think what I might do is prepare hinge rebates both ways, so I can hang it opening inwards, and then change my mind later if an outward opener seems a better idea, later on.
Thursday, 20 November 2014
Cracking On
Today was a pretty decent day for November. Hardly a cloud in the sky, con-trails clear and bright in the upper atmosphere, very little wind and gloriously sunny.
Eco had bagged up two one-tonne Jewson bags of sand from round the side of the Manor which needed moving, and I removed the plastic tanks from a pair of IBC's so we could get rid of the large pile of composting hay and rush sat in the Goat Field. A couple of tin sheets to stand pallets on, and two IBC cages of hay and two tonnes of sand duly re-positioned round the back of the Chicken House.
On the way out to work this morning, I called in at Jewsons and bought a (very expensive!) roll of breathable membrane to fettle the front of my timber frame. £54 for a 50m roll....I used 2.3m! Ah well, I'm sure it'll come in handy later in the fit-out.

Membrane stapled to the frame and tucked around the door frame. I also fitted and did the initial sealing around the door frame, so the construction work on the front wall is now finished and structurally strong.


The view from the window. I need to clean it...it's been sat in the garage for six months and a little mucky! With the membrane in place, you now get an idea of what the end wall looks like from inside. The window does make a difference. Lovely view over the brash piles and the Goat Shed. Some tidying up and landscaping work before we erect the polytunnel and turn the Goat Shed into a garage for Squeaky Joe and his implements. We need to do something about a trackway in front of the boxes too. The tractor has churned up a fair bit of mud and it's well gloopy after the rain over the last few weeks.

I'm pretty sure the destructions for the membrane said 'writing side out'...! Retrotecchie's Tool Of The Month for September really came into it's own. The Parkside pneumatic stapler from Lidl - brilliant. I really like that tool.
Eco had bagged up two one-tonne Jewson bags of sand from round the side of the Manor which needed moving, and I removed the plastic tanks from a pair of IBC's so we could get rid of the large pile of composting hay and rush sat in the Goat Field. A couple of tin sheets to stand pallets on, and two IBC cages of hay and two tonnes of sand duly re-positioned round the back of the Chicken House.
On the way out to work this morning, I called in at Jewsons and bought a (very expensive!) roll of breathable membrane to fettle the front of my timber frame. £54 for a 50m roll....I used 2.3m! Ah well, I'm sure it'll come in handy later in the fit-out.
Membrane stapled to the frame and tucked around the door frame. I also fitted and did the initial sealing around the door frame, so the construction work on the front wall is now finished and structurally strong.
Although strictly an interior door lining, by the time the shed has been clad, all the joints have been frame-sealed and the whole shooting match given a few coats of exterior woodstain, there shouldn't be any real problems with weatherproofing. It's just a shed, when all is said and done, but much better engineered than a conventional larch-lap garden jobby!
I'm pretty sure the destructions for the membrane said 'writing side out'...! Retrotecchie's Tool Of The Month for September really came into it's own. The Parkside pneumatic stapler from Lidl - brilliant. I really like that tool.
Wednesday, 19 November 2014
Office Construction
Well now that the van bodies are in place, it's time to start fitting them out. The Woodwork and Metalwork Shops are going to have non-symmetrical double doors. Non-symmetrical because it means less cuts on a standard 1220mm x 2440mm sheet for the larger door, and because the 'personnel' access door doesn't have to be as big an opening as the other door.
The Site Office is going to be a little different, having a conventional glazed timber external door and a wall across the front, fitted with a non-opening window. I could have gone for an opening window but it's more for natural light purposes than ventilation and I happened to have an old sealed double glazed unit in stock that I 'framed' when I was still down in Surrey, on the premise that 'it might come in handy one day'!
So, the first job was to obtain some 44mm x 44mm planed timber and give it a woodstain coating. I could have used treated timber, but it is going to be an enclosed frame and I find planed is a little easier to work with.

I'm going to be using a fairly standard 762mm (30") wide external double glazed door, so the frame has been designed to accommodate a 22mm internal door lining. The exterior of the frame will be lined with a breathable membrane and then clad with shiplap or similar timber. The internal wall will be insulated and clad with either a sheet material like OSB or ply, or clad with T&G softwood.

The frame has been bolted to the galvanised aperture of the van body using 8mm x 75mm coach bolts which you can just see in the image above, This, plus a continuous bead of flexible frame sealer should ensure a weathertight fit into the door aperture. The box sections down each side will be filled with an insulating material before being clad up to the interior walls of the van sides. This should give a reasonably good cosmetic finish, as well as mitigation of heat loss through the body corners,

Hopefully a reasonably strong construction to protect against westerly winter winds. The frame has been skew-screwed and assembled with No-Nails. By the time this has the door casing fitted, the door hung, the breathable membrane attached and been clad, it should be pretty solid. I'm looking at a minimum of a five year life for this assembly, and longer if any protective coating is renewed periodically.

Kind of looks like it has been 'Photoshopped' in, doesn't it?! Should look pretty good once the cladding goes on.
The Site Office is going to be a little different, having a conventional glazed timber external door and a wall across the front, fitted with a non-opening window. I could have gone for an opening window but it's more for natural light purposes than ventilation and I happened to have an old sealed double glazed unit in stock that I 'framed' when I was still down in Surrey, on the premise that 'it might come in handy one day'!
So, the first job was to obtain some 44mm x 44mm planed timber and give it a woodstain coating. I could have used treated timber, but it is going to be an enclosed frame and I find planed is a little easier to work with.
I'm going to be using a fairly standard 762mm (30") wide external double glazed door, so the frame has been designed to accommodate a 22mm internal door lining. The exterior of the frame will be lined with a breathable membrane and then clad with shiplap or similar timber. The internal wall will be insulated and clad with either a sheet material like OSB or ply, or clad with T&G softwood.
The frame has been bolted to the galvanised aperture of the van body using 8mm x 75mm coach bolts which you can just see in the image above, This, plus a continuous bead of flexible frame sealer should ensure a weathertight fit into the door aperture. The box sections down each side will be filled with an insulating material before being clad up to the interior walls of the van sides. This should give a reasonably good cosmetic finish, as well as mitigation of heat loss through the body corners,
Hopefully a reasonably strong construction to protect against westerly winter winds. The frame has been skew-screwed and assembled with No-Nails. By the time this has the door casing fitted, the door hung, the breathable membrane attached and been clad, it should be pretty solid. I'm looking at a minimum of a five year life for this assembly, and longer if any protective coating is renewed periodically.
Kind of looks like it has been 'Photoshopped' in, doesn't it?! Should look pretty good once the cladding goes on.
Friday, 14 November 2014
.jpg)
Friday, 31 October 2014
Temporary Power
Having got the truck bodies in situ, we now need to begin fitting out. This will involve a lot of cutting, drilling, grinding and other processes so we're going to need power tools. Power tools means power and although we can do some work with cordless drills and the 300W inverter system, we're going to need a couple of kW capacity for the heavier toolage.
Our temporary feed to the Toyshed was upgraded so we could wire in another extension lead and run the cement mixer while we were laying the foundation blocks, but now we are going to need something a little more organised for working in and on the bodies.
Two 45m extension leads from B&Q and a handful of CEE.II 240v 16A connectors (a.k.a. Commando) and we have run a more useful supply to No 2. body (The Office).

The cable runs from the stone barn, overhead to the Goat Shed, and then along the inner fence line. We fed the cable through some polythene water pipe to give some protection for the last few metres to the back of the bodies. A CEE.II line socket on the end of the cable allows us to plug in a CEE.II to 4-Gang 13A trailing block, connect directly to the power inlet on the cement mixer, or to connect to the sheds.

The body is fitted with a 45 degree bulkhead plug. The cable from the barn can be plugged directly onto each box as required and ultimately we will have a junction box behind the four bodies where the main incoming feed can be split three ways. Once all the landscaping and groundwork has been completed, our 'temporary' feed will be replaced with an underground armoured cable. In theory - they say there isn't anything as permanent as a temporary lash-up!

The two brown gungy strips are beads of mastic where the lashing rails were fitted to the insides of the bodies. This all needs stripping off and then cleaning, and a little remedial work to the old screw holes. The rails were only held on with 10mm long self-tapping screws, but 120 of them at 2" intervals spreads the loading quite nicely. Having drilled the hole to feed the power cable (grey) through the wall, we determined that the walls are fibreglass laminated inside and out onto 18mm marine ply. Should last a couple of decades at least.
Each body will be fitted with it's own mini consumer unit with separate MCB's for lighting and power circuits, but for now (and until we get the doors on and render the boxes fully weatherproof) we have terminated the external CEE.II plug on No 2 body with a single weatherproof IP56 13A socket. The remainder of the cable on one of the extension leads allows us to reach into the two adjacent bodies - The Store and The Wood Shop. Eco can fettle firewood in The Store over the next few days, and I will be able to crack on with fitting out the Office.

Polythene pipe coming in under the rear of the bodies. The cones will hopefully stop us tripping over the pipe! Now, you might just be able to make out from the photo that the rears of the bodies are in as good a line as the fronts. With one exception. No 4 (Metal Shop) sticks a little further back. We hadn't actually measured the bodies...we just assumed they were all 20 footers. When we placed the last one and measured it up, it was a foot longer than the others. There were two possibilities at this juncture. Either the fourth body was a 20' unit and we'd been 'robbed' on the others and they were actually only 19' long, or we'd dipped in on number four and it just happened that that one was a 21' unit. The latter was the case, so our Metal Shop is just a tad bigger than we planned. Eight square feet of additional floor, or 64 cubic feet extra volume. Bonus!
Interestingly, you can clearly read the telephone number and web address of Nightfreight on the side of the first body, as well as just being able to see part of their logo. The signwriting (vinyl-cut) has been removed but the colour under the writing hasn't faded over time! The second box still has the original yellow stickering.

A little difficult to make out - taken on my crappy phone - but there is an extension lead plugged into No 2 box, running into No 1 box where Eco has the saw-bench set up. The rest of my afternoon was spent on repairs to the corners of the bodies where there was a little 'battle damage' and a few leaks. Hopefully they are watertight now and won't leak...fingers crossed. In 3 and 4 you can see the lashing rails which have not yet been removed/reprofiled/repurposed.
Our temporary feed to the Toyshed was upgraded so we could wire in another extension lead and run the cement mixer while we were laying the foundation blocks, but now we are going to need something a little more organised for working in and on the bodies.
Two 45m extension leads from B&Q and a handful of CEE.II 240v 16A connectors (a.k.a. Commando) and we have run a more useful supply to No 2. body (The Office).
The cable runs from the stone barn, overhead to the Goat Shed, and then along the inner fence line. We fed the cable through some polythene water pipe to give some protection for the last few metres to the back of the bodies. A CEE.II line socket on the end of the cable allows us to plug in a CEE.II to 4-Gang 13A trailing block, connect directly to the power inlet on the cement mixer, or to connect to the sheds.
The body is fitted with a 45 degree bulkhead plug. The cable from the barn can be plugged directly onto each box as required and ultimately we will have a junction box behind the four bodies where the main incoming feed can be split three ways. Once all the landscaping and groundwork has been completed, our 'temporary' feed will be replaced with an underground armoured cable. In theory - they say there isn't anything as permanent as a temporary lash-up!
The two brown gungy strips are beads of mastic where the lashing rails were fitted to the insides of the bodies. This all needs stripping off and then cleaning, and a little remedial work to the old screw holes. The rails were only held on with 10mm long self-tapping screws, but 120 of them at 2" intervals spreads the loading quite nicely. Having drilled the hole to feed the power cable (grey) through the wall, we determined that the walls are fibreglass laminated inside and out onto 18mm marine ply. Should last a couple of decades at least.
Each body will be fitted with it's own mini consumer unit with separate MCB's for lighting and power circuits, but for now (and until we get the doors on and render the boxes fully weatherproof) we have terminated the external CEE.II plug on No 2 body with a single weatherproof IP56 13A socket. The remainder of the cable on one of the extension leads allows us to reach into the two adjacent bodies - The Store and The Wood Shop. Eco can fettle firewood in The Store over the next few days, and I will be able to crack on with fitting out the Office.
Polythene pipe coming in under the rear of the bodies. The cones will hopefully stop us tripping over the pipe! Now, you might just be able to make out from the photo that the rears of the bodies are in as good a line as the fronts. With one exception. No 4 (Metal Shop) sticks a little further back. We hadn't actually measured the bodies...we just assumed they were all 20 footers. When we placed the last one and measured it up, it was a foot longer than the others. There were two possibilities at this juncture. Either the fourth body was a 20' unit and we'd been 'robbed' on the others and they were actually only 19' long, or we'd dipped in on number four and it just happened that that one was a 21' unit. The latter was the case, so our Metal Shop is just a tad bigger than we planned. Eight square feet of additional floor, or 64 cubic feet extra volume. Bonus!
Interestingly, you can clearly read the telephone number and web address of Nightfreight on the side of the first body, as well as just being able to see part of their logo. The signwriting (vinyl-cut) has been removed but the colour under the writing hasn't faded over time! The second box still has the original yellow stickering.
A little difficult to make out - taken on my crappy phone - but there is an extension lead plugged into No 2 box, running into No 1 box where Eco has the saw-bench set up. The rest of my afternoon was spent on repairs to the corners of the bodies where there was a little 'battle damage' and a few leaks. Hopefully they are watertight now and won't leak...fingers crossed. In 3 and 4 you can see the lashing rails which have not yet been removed/reprofiled/repurposed.
Wednesday, 29 October 2014
Bodies Abound

Left to right: The tractor Eco used to shuffle these into place, a stack of IBC's awaiting repurposing, the slightly tatty mobile chicken shed we have been using as storage up to now and four bodies.
The pile of timber laying to the side of the fourth body is the 9"x 2" planks and the 6" x 6" baulks (fenceposts) we used as sledges to gently ease the units into position over the concrete blocks.
Once each body was in approximately the right position, we did the final adjustment by hand using timber and a hi-lift farm jack. Once set on the base blocks, adjustable wedges were used between each chassis rail and each block. These gave us the fine tuning (to within a few millimetres!) to the final seating.
Reading from left to right again:
1 - Still has the original roller shutter tailgate and will be the general storage shed.
2 - Designated as Retrotecchie Ltd office and tea-makings!
3 - The Woodwork Shop
4 - The Metalwork Shop
Monday, 27 October 2014
Off-Grid in Cornwall
The Hobbit and I have just returned from a pleasant weekend down in Lostwithiel. For the last few weeks I've been playing email ping-pong with another member of the Forum, gucu, who has built himself a recycled shed down at the bottom of his garden and wanted to put in an off-grid solar system to power garden lights and his aquaponics pump.
He procured the inverter, solar charge controller and batteries and I advised him on minor details like the battery interconnects and how to set up the system. I'd hoped to drop down to Cornwall one week while I was working in Portishead but due to work schedules and his training commitments a suitable window of opportunity had been evasive,
So, we jumped in Pudgy, dived over the bridge and down the M5 and A30 and went to visit gucu, his lovely wife annapuddles and the kids.
Saturday was a day of manly shed-time while the girls went for a mooch round Lostwithiel.
Photos shamelessly stolen from gucu's blog - I'm sure he won't mind!
Four 12v 15Wp thin-film panels installed on the sloping roof, South South West orientation.
Two Alphaline 88Ah deep-cycle leisure batteries wired as a parallel bank and powering a 300W Sterling Pure Sine Wave inverter. To test the inverter we used an anglepoise lamp with a 25W incandescent bulb. You can see the LED display on the inverter showing the load in watts.
Having got the mains output working, I used the inverter to power my soldering iron which I then used to wire up the panel connections and create the input side of the system. The panels feed a Steca Solsum 10.10 charge controller which is then connected to the batteries using 6mm heavy duty cable. Although the total capability of the controller is only 10A and the cable is capable of handling 37A, by using far thicker cable than the current rating suggests, this reduces resistive losses to a very low figure thus getting maximum charging voltage into the batteries.
See that smile on my face? I'm always happy when I'm fettling!
So, all done and dusted, and the inverter and controller mounted in their final positions. I'd pulled 35W for about half an hour with the soldering iron, and with the light for testing, I estimated we'd used some 20-25Wh of the available battery capacity. It was a fairly overcast day, with a few spots of rain, but by the time we'd had a cup of coffee and a pasty for lunch, the charge controller status display was showing charge coming from the panels and the battery monitor was flicking between orange (charging) and green (charged). Ten minutes later, the batteries were showing full again. That is the biggest advantage of using thin film panels...their performance and output in poor conditions is much better than poly or mono panels. Ok, in perfect conditions you can expect a higher output from the more expensive panels, but for the next six months, the UK winter insolation is going to be far from perfect.
Smiles all round, and a good job jobbed.
Friday, 17 October 2014

Sunday, 14 September 2014
To get back to business
'lo peeps!
Honestly, where does the time go? It seems all I've done recently is use the Blog for hosting pictures for the Forum's "Where in the World?" section,
Anyone would think all I do is sit at the 'pooter all day and faff about. Mostly true.
So what's been happening on the project? Well, we have been making progress of sorts up at The Manor. Slower than hoped possibly, due to my work commitments and having moved away from The Servants Quarters and into my own accommodations now, but there has been movement and much of that has involved earth.
A couple of major projects on the go right now...plus the usual maintenance, headscratching and machinery repairs.
One of the problems we have is storage. As Eco is fond of saying "all this space but nowhere to put anything". Well, we have addressed that particular issue and the last few months has been spent putting a new plan into action.
We were looking at storage space. We needed more undercover storage for machinery and tools, the Chicken Shed needed fettling badly as the winter storms battered it somewhat, and we also need more 'workspace' for things like metal fabrication, woodwork and my electronics projects. Several thoughts crossed our mind. Small wooden sheds, containers, build the shower block as a 'shell' to create a temporary store, perhaps even a tent just to get some stuff under cover. We'd done a little research and asked a few questions, but it was a chance conversation with Ifan up at Jones The Feed that set us of in a completely unexplored direction and gave us a heads up on the perfect solution.
Van bodies.
You've seen them. 7.5 tonne rigid bodied delivery lorries...usually with a roller shutter door on the back and a tail-lift. The ones that clag up the small streets in town in the morning delivering to shops and businesses. The parcel lorries....not the small DPD or Citilink Transit-sized courier vans, but something bigger than a Transit but smaller than an artic.

You may have also seen those fancy horseboxes? Not the little Nissen hut on a small trailer jobs, but the six-figure sum fancy ones that combine a horsebox for a small trotting team with a Winnibago.

Honestly, where does the time go? It seems all I've done recently is use the Blog for hosting pictures for the Forum's "Where in the World?" section,
Anyone would think all I do is sit at the 'pooter all day and faff about. Mostly true.
So what's been happening on the project? Well, we have been making progress of sorts up at The Manor. Slower than hoped possibly, due to my work commitments and having moved away from The Servants Quarters and into my own accommodations now, but there has been movement and much of that has involved earth.
A couple of major projects on the go right now...plus the usual maintenance, headscratching and machinery repairs.
One of the problems we have is storage. As Eco is fond of saying "all this space but nowhere to put anything". Well, we have addressed that particular issue and the last few months has been spent putting a new plan into action.
We were looking at storage space. We needed more undercover storage for machinery and tools, the Chicken Shed needed fettling badly as the winter storms battered it somewhat, and we also need more 'workspace' for things like metal fabrication, woodwork and my electronics projects. Several thoughts crossed our mind. Small wooden sheds, containers, build the shower block as a 'shell' to create a temporary store, perhaps even a tent just to get some stuff under cover. We'd done a little research and asked a few questions, but it was a chance conversation with Ifan up at Jones The Feed that set us of in a completely unexplored direction and gave us a heads up on the perfect solution.
Van bodies.
You've seen them. 7.5 tonne rigid bodied delivery lorries...usually with a roller shutter door on the back and a tail-lift. The ones that clag up the small streets in town in the morning delivering to shops and businesses. The parcel lorries....not the small DPD or Citilink Transit-sized courier vans, but something bigger than a Transit but smaller than an artic.
You may have also seen those fancy horseboxes? Not the little Nissen hut on a small trailer jobs, but the six-figure sum fancy ones that combine a horsebox for a small trotting team with a Winnibago.
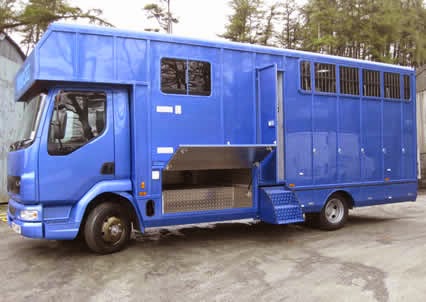
This fine example is produced by a company near us in Lampeter - Tristar Horseboxes. A lovely conversion based on a 7.5 tonne van. They take the 7.5 tonne base vehicle, often a second-hand freight van, remove the rigid body and then do a custom coachwork job on the chassis to build these wonderful custom equestrian 'homes from home'.
The 'byproduct' of these conversions? Van bodies. 20ft long, 8ft wide and 8ft high. Solid floors, steel bearers, laminated wooden walls and a lightweight fibreglass roof.
That's 160 square feet of floor space....1280 cubic feet of dry storage.
Cost? Well, a half-decent 6x4 garden shed will set you back £200. A wooden shed made to measure with the same dimensions as a van body? Not much change out of £1500 or more.
Four van bodies, delivered to site courtesy of Tristar...around £1700, or £425 per 'shed'.
They all need a little work. Some more than others. But have tools, willpower and determination...can fettle!
Two blue Nightfreight units. A little attention to the upper corners where they have been bashed on low bridges or overhanging rooves, minor repairs to the roller-shutter door on one and a complete strip out of the roller-shutter door on the other one. One storage unit for random gubbins and equipment and one potential site office, electronics workshop and accommodation for yours truly.
Two white bodies, one signwritten with a haulage company and one plain. The metalwork shop and the woodwork shop.
We had some fun and games with one of them, removing the remains of the hydraulic tail lift assembly. Much sweating and struggling with angle grinders, drills and hammers. We had some fun and games with all four of them, trying to balance them on extension forks on the tractor and juggle them around the goat-field! Not easy and some moments of serious ring-twitching for both of us, but they are now ready to locate in their permanent position in the lower end of the goat field. Once installed, we can fit them out, hook up power and lighting, run phone lines and internet down to the office and begin to get our construction and infrastructure projects on the go. Once they are finished and in situ, the rest of the goat field can be mown and levelled ready for erection of the wood-drying and humanure fermenting polytunnel.
Photos to follow in due course, but we've scraped the foundations, laid out the site and begun concreting the bearer blocks into place. Within a month we hope to have the bodies all set up and ready for fit-out. I just have the small matter of Portishead Mk2 getting in the way between now and Christmas.
Monday, 25 August 2014
Warwick Castle

Sunday, 24 August 2014
WITW (again!)

Wednesday, 13 August 2014
WITW


Saturday, 26 July 2014


Sunday, 13 July 2014
Powis Castle

Monday, 30 June 2014
Aberystwyth from Constitution Hill (Y Consti)

Y Consti at the top of Constitution Hill, looking down over Aberystwyth and Cardigan Bay. Jean and I took Tortoise up here on the Cliff Railway for a spot of lunch.
Subscribe to:
Posts (Atom)