Sunday, 7 June 2015

The Sun Is Shining

...so about time I did something to capitalise on it. The solar PV panels are still sat in the shed unused so I really must deploy those before too long. It's nearly Midsummer's day so we're at the time of the year to harvest that free energy.

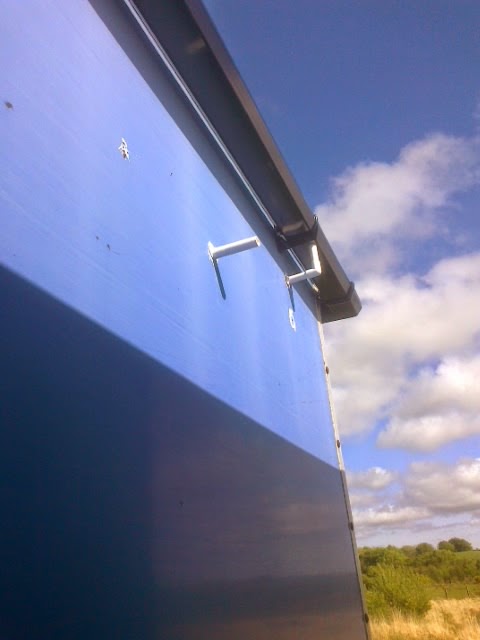
The solar hot water collector is another step closer. Today I made up some brackets to fit the panel to the rear of the box (that's rear looking in from the doorway - it would be the front of the van, behind the cab otherwise).


Definitely in shadow as this shot was taken, but this was at 4pm and the sun has moved round towards the west. At noon, the panel is getting full sun. The radiator dropped in a treat and leaves the perfect gap between the front surface and the glazing when that goes on. The connections to the radiator will be one male end of a 15mm compression joiner allowing a nice seal into the steel threads where the valves would normally go and the ability to compression fit the connection pipework. I've previously soldered my fittings but they can fail under extremes of temperature. Compression fittings will allow the unit to be removed for maintenance if necessary. Fortunately the donated radiator had four ports with blanking plugs in two of them so I was able to remap the ports and crossflow the plumbing. You can just see the 'flow' outlet on the top left.


The hole in the panel support arm (above) will be the 'cold' return to the panel. The dimensions of the enclosure are on the snug side, so the compression fittings will need to be tightened from the inside with the pipes inserted into the olives. The green object is a tapered wedge. Two of these will allow me to seasonally adjust the radiator within the frame so I don't put any strain on the plumbing during tightening. Once the feed and outlet pipes are fitted and secure, the radiator can have a coat of matt black paint and then the glass can be affixed to the front. It would have been nice to get this all tightened up and aligned today, but I was shy one of the 15mm compression fittings. These things happen.


Internally, I tidied up some of the lighting electrics today. The temporary bulkhead fitting in the main office has now gone, and the slightly complex wiring for the two-way switching is now nice and tidy in a junction box. I took the light feed over the top of the false ceiling and fitted a rather funky spotlight unit (going begging from my folks, so it would have been be churlish to refuse it) which has had the GU10 50W halogen spot bulbs removed and replaced with low energy 5W LED bulbs.


Rather nice-looking, methinks. Nice decent light output and the ability to aim the lights as required once the internal desk and furniture is all in its final arrangement. All the electrics are pretty much finished now, so I can put some trunking around the cabling from the consumer unit and make it all hidden and tidy.

It's the middle of summer and I tend to knock it on the head for the day at around 5.30pm so I won't benefit from the lights for a while yet - there's plenty of natural light through the translucent roof and the window, but when the evenings do begin to draw in, I'm ready to rock and roll.

Thursday, 4 June 2015

Another Day With A Dead Phone

Sorry...no more pictures just yet. Phone was flat again today.

What's been doing? The whole floor has now been painted so we're grey throughout, although the main office could probably do with a second coat. Pretty much a pottering day today, using up the last of whatever materials I have to hand - my weekend away down South has kept me out of suppliers!

I took the two long pallet-wood slats down yesterday. Just under 8' long each so I figured they'd come in handy for something. Quite what, I wasn't sure but today an opportunity presented itself. Having got the water supply sorted (and it rained earlier this week so I was greeted with a full tank today) and the electrics all commissioned, tunes in place and loo all finished I was looking at uses for the leftover materials to keep me tootling along. 

A while ago, we were 'donated' an unwanted central heating radiator that has been sat for a year leaning against the deck up at The Manor and looking a little unloved. There was a plan to use it as a solar thermal collector and the need for hot water now the cold supply is in has crossed my mind again so there was an opportunity to fettle summat. When I ran a ruler over it, it measured 57" long and a shade under 23" tall. Oooh...I could cut a 60" long piece and a 24" short piece from each pallet slat with a mite left over, so that's what I did.

Screwed together to make a 4" deep rectangular carcass, I took the tatty bit of ply that used to form the backboard of the van body, chopped a 60" x 25" piece out, and I made a 'tray'. This then got a couple of rubs over with the sander and a couple of coats of stain and an inner liner made from the Recticell insulation board. I now have a box to install the radiator into. A coat of satin black for heat absorption and a sheet of glazing over the front to act as a greenhouse, and I will have the perfect solar thermal collector.

I was a bit worried about the orientation of the box, but it would appear that today (4th June) at noon, the sun was full-on on the rear wall of the box. Looking at the shadows out the front, the rear wall is pretty much south-facing at noon-ish, so in fact, the orientation is pretty good. I'll mount the collector on the angle brackets on the back wall and arrange a couple of struts to tilt the panel up at about 35 degrees. The heat exchanger, pump and pump controller I already have from the old Toolshed wood-fired system, so I'll re-purpose that for my solar DHW system.

Thursday, 28 May 2015

Busy Again

I managed to do a little work in the van today. A final coat of masonry paint on the end wall (inside and outside the facilities) and some minor tidying up. Most of my day today was spent on remedial work on the digger. The last time Eco used it, the 'dozer blade was very reluctant to operate so we had a quick look on Tuesday and I'd worked out a game plan which I decided to have a go at today.

The problem boiled down to stiffness in the linkages from the blade control lever to the hydraulic valvegear. The swivels on the rotating linkages were pretty rusty and the lateral linkages weren't in the best of shape either. A good soaking with penetrating oil then some beasting with a hammer and the linkages are now free, if a little stiff. Before lunch the 'dozer was working.

I needed to make a small reinforcing plate for the top pivot bracket. The bracket itself was a nice thick 'U' bracket, but it was bolted through a very thin steel plate and this steel was flexing rather than the effort travelling down the linkage.

All reassembled, plate fitted and I went to start the engine, and it wasn't having any of it. The chap over the road had borrowed it and returned it pretty empty so our first thought was fuel starvation. We filled the diesel tank, and tried again, but after a minute or so of coughing and hunting, it gave up again then completely refused to even try firing. Eco had a spare fuel filter kit, so we purged the fuel lines, fitted new filters and a complete main filter housing and put everything back together again. Still it refused to play ball. There wasn't a lot of fuel showing in the filter glasses, and we'd noticed that we couldn't hear any 'ticking' from the electric fuel pump, so I looked into the cause of that. Turns out I had slightly dislodged a multi-way connector on the control panel during my ferreting around in the mechanics, and as soon as I waggled it a little, the fuel pump kicked in. One more try of the starter button and she roared into life.

New filters, fuel system as per manufacturers setup (rather than retro-fit inline filters) and all is as it should be. The 'dozer blade works fine now and we're back in operation. The linkages are still a little stiff, but a combination of use and more lubrication should ease them back to normal feel, we hope.


Now the toilet floor is dry and traffic-ready, I cleared out all the gubbins in there and you can now get a better view of the slow sand column filter and the plumbing.


A close-up of the electricals. The main incoming feed (6mm) from the external 16A connector runs up a length of mini-trunking and into the digital kWh meter. The 'tails' from the meter are again 6mm cable and feed the RCCD main breaker. A 16A MCB protects the sockets and a 6A MCB protects the lighting circuits. You can just see the earth cable coming in to the bottom of the consumer unit from the TT earth bonding system, and the 2.5mm grey cable runs down to the weatherproof 13A socket which is our temporary feed (via an extension drum) to the other van bodies. Ultimately, each body will have it's own independent power supply and this extra temporary) socket will be removed.

]

Just a random photo looking out of the office window and across the Goat Field. The Landrover has now had a major oil-leak repaired (the oil feed pipe to the turbocharger had broken) and is now ready to go off and get an MOT. 


Tuesday, 26 May 2015

Some More Photos Of Progress


Just a few photos of the office by way of an update. Ewww....the lens on my camera really is a bit fish-eye, isn't it? It's not the van that's warped - trust me! Another coat of stain and varnish on the external woodwork. You can see the guttering running around the perimeter of the roof. We've not had much rain in the last few days so the ground outside the van is quite firm now.


The guttering goes round the van in a complete loop, so has a surface area of around 2 square metres.


Here you can see the 21.5mm PVC pipe that channels the water into the filter unit. The overflow pipe prevents the storage tank from overfilling.


Looking good now. We really must turn our attention to the woodwork and metalwork shops next now that we have some good weather.

Internally, the second coat is finished on the kitchen floor, I've swept up most of the sawdust, cut the architrave to trim along the front wall once it is clad and the loo has had it's first bucket-change so it's all smelling sweet and freshly painted. I also put a couple of screws up near the top of the partition wall to hang the speakers on. Less shelf-space taken up and more room for stuff.


Shot taken through the front window, hence some reflection and smearing. I still have the compound mitre saw in the office area, but other than that, the floor is pretty clear now. I need to get some more floor paint to do the main office area although the edges have already been cut in.


Sunday, 24 May 2015

Trimming and Tatting


Today I took down a pack of rounded architrave and used the compound mitre saw to chop some angles and bevels. The door to the loo is now trimmed in and the 'skirting' is now in place. A second coat of paint on the loo wall and the first coat on the main loo floor is now done and drying, and I got a second coat of floor paint on the section of floor outside the loo.


The partition wall between the kitchenette and office now has it's edging trim and is looking much more finished now, Just another coat of Sandtex and it's done.

Architrave and trimming finished around the door-frame and the end wall and all the woodwork now ready for a final rub down with a fine emery paper and then a coat of gloss paint.


Apart from the final decoration and trimming out, the loo and water supply is now finished. The new slow sand filter is in place and water is running nicely. 

The guttering feeds in using a couple of sections of solvent-weld 21.5mm waste pipe and this has been terminated with a tank connector. The 3/4" plastic thread usually passes through a tank body and is secured with a backnut and a couple of rubber washers to produce a watertight seal, but you can see in the image above I have used a 3/4" appliance hose (washing machine cold fill hose) to make the inlet and outlet hoses for the filter. The outlet hose acts as the weir to the storage tank and the outlet height has been set to leave a 5cm layer of supernatent water on the surface of the filter so it always maintains a wet layer above the filter media and prevents the bio-film from drying out. So far, no leaks!

The bucket is left over from my initial purging and run-through...it doesn't need to be there, but as I'd just painted the floor, I couldn't retrieve it!


Close-up of the filter showing the inlet and outlet hoses. There is just enough space to open the threaded cap on the top of the filter to remove and clean the foam biofilter as needed, and the whole unit can be removed for more serious cleaning or maintenance as required. The filter can be drained by removing the outlet hose from the storage tank and draining it down into a bucket, the inlet can be disconnected and the whole filter column removed and worked on. For now, the column is just supported by the stand at the bottom, but ultimately I may fit a 110mm drain collar bracket just for additional support.


Friday, 22 May 2015

Filter Mk2 - We have lift-off!

No pictures today - my camera-phone had a completely flat battery and I didn't have a charger with me, but I can finally report a stunning success on the filter front.

More research into the finer points of slow sand filtering eventually led me to throw away the rule-book (which is mostly American) to some extent, and to pick up on some research conducted here in the UK. Several factors have come to light as a result of my web trawling.

The sand - forget common or garden builder's sand. What I needed was a fairly specialist type of sand called 16/30 silica sand. This is very clean and has a carefully graded particle size of 0.5mm to 1mm. It's much coarser than builder's sand, but has a very uniform spread of particle sizes and is the 'right stuff for the job'. Used in swimming pool filters and aquarium filters, it has exactly the right properties. Builder's sand was fine in my larger butt, and it had been well flushed and was filtering ok, but the much larger surface area allowed a reasonable flow. In my 4" filter, there was nowhere near enough surface area to allow more than half a cup an hour of flow, and the almost clay-like minute silt particles just clogged the outlet up.

Depth of sand - conventional wisdom, he say a minimum of 40-60cm of media depth...more if you can afford the space, and a good 50cm or more of head at the inlet. My new findings say I can get away with much less...as low as 15cm potentially. I settled for 25-30cm of sand as that works well in my filter column. With a proviso...and here is the real deviation from the rules.

Reticulated PE foam - filter foam in other words. A very low resistance to flow, but a large surface area on which the active biolayer (schmutzdecke) can form, without forming a homogenous layer on the surface of the sand and slowing the filter down too much and causing head loss.

Apparently, 25mm-50mm of foam sat on top of the sand media does exactly the same job as an extra foot of sand and a schmutzdecke. It also means that the effective run-time of the filter is increased several-fold, the head loss is reduced to almost nothing, and the sand only has to act as a mechanical filter, rather than a mechanical and biological filter. Foam filters have been used for some time in the fish-keeping game. I once had tropical fish and used a bio-foam filter in my aquarium, and this foam on the top of the sand media works in exactly the same way. The bioactive layer forms on the foam, rather than the sand itself....it has a much larger surface area because of the many walls between the pores of the foam, and better still, the foam just needs to be removed and cleaned gently under the tap every so often to wash out any sediment, leaving behind the majority of the active biolayer.

I've read the in-depth analysis, reports of field trials and results of water quality tests on the system, and I'm totally swayed to the new concept. So, a couple of purchases on ebay...one sheet of 50cm x 50cm x 2.5cm reticulated PE filter foam, and one 25kg bag of 16/30 silica pool filter sand.

As luck would have it, today was not only a nice day and I managed to get a bit more painting done, but both my deliveries turned up by mid-afternoon.

I rebuilt the filter and output hose (with washed gravel over the collector tube), set the output hose at about 20cm from the top of the filter column and flushed through three buckets of water. With the hose blocked off so the water stayed in the pipe, I then slowly added the silica sand to the right final level. I ran the three buckets through again, catching the outfall in an empty bucket, and passing it back through the system. The silica sand was pretty clean and dry to start with, but this flushing through was designed to rinse out any 'dust' and to ensure the sand bedded in and formed a nice air-free column. After several runs, and pretty fast runs too, the water was coming out almost clear. 

Compared to the original sand butt which produced a very small trickle, dying back to a few drops as the head in the butt got lower, this new filter runs at something like a half a litre to a litre a minute. A little too 'fast' for a slow filter, but with zero head loss and no bio-layer, I'm rather pleased at the speed. The filter was then replaced in the facilities and the outlet pipe coupled back up to the clearwell tank. With a circular piece of the new PE foam in place on top of the sand media, I then filled the column with fresh water (pre-filtered through the Pozanni) to the point where it just began to flow (head height=outlet height). At the point it stopped, the height of the water (supernatent water) above the foam filter (soon-to-be 'schmutzdecke') was checked and found to be a sliver under 5cm, which is apparently the optimum height to allow oxygenation of the biolayer through the water, and to prevent the biolayer drying out. To be fair, I had already marked the heights I wanted to be at, and this was close enough for me. A centimetre or so either way, and I could have added or removed a little sand from the column to optimise my supernatent water level. As it turned out, it was almost spot-on at the first attempt. Sometimes it's luck...sometimes it's luck!

Now, in theory, I should have no leaks, a well-proportioned and effective filter and a rapidly establishing biological filter and a unit that will require a lot less maintenance. Perhaps a weekly or fortnightly inspection and rinse of the foam filter, and then a media (or possibly even a complete column) change perhaps as infrequently as 3-6 months or so. 

All I need now is some rain to check that it can cope with the flow-rate from the gutter without complaining to much. I think it will handsomely.

I think I'll let the system establish itself over the next week or so, drain off some of the existing clearwell stock and run it back through the gutter a few times, and then get a chemical/biological test kit and analyse the water produced. If the tests look really good, I may even be able to bypass the Pozanni cartridge altogether and improve the overall flow rate from the storage tank. For now I'll accept a trickle from the tap knowing that my as yet 'unknown quality' of water is going through a triple stage ion-exchange and activated carbon 'backup'.

I did make three cups of coffee today with water from the tap. As yet...no ill effects :o)


Tuesday, 19 May 2015

More Progress

A bit of a disaster on the filter front after a night of heavy rain. Flow through the filter just isn't happening and the guttering had backed up to the point of overflowing. With the dimensions of the new filter, compared to the proportions of the butt filter, it seems that the builder's sand I used just isn't cutting it. The outlet pipe/weir was seriously clogged with fine sand silt and the filter was leaking from the inlet hose due to the sheer weight of water. I've now stripped the filter, connected the guttering directly to the storage barrel (which is now full!) and removed all the sand and rinsed the gravel. I'm going to get a bag of sharp sand which should have a larger grit size and better filtering properties. The fine builder's sand just seemed to turn to a slimy mud. I'm wondering now exactly how effective the butt filter was. The larger surface area would have helped, but there is always the chance that any water filtering through the butt was travelling down the walls between the butt and the sand itself, rather than filtering through the sand bed. One lives and learns...


A first coat of floor paint on the floor in the kitchenette. 


Another sheet of OSB fitted to the partition between the kitchenette and the office proper. This is now pretty much the finished wall, bar a final coat of paint and the skirting. 


The floor will need a couple of coats at least to fully cover and seal the phenolic board floor and to give a reasonably hard-wearing surface finish. I'm going to put down some rubber-backed mats to prevent the floor getting too shabby too quickly.