Friday, 15 May 2015

Leakier Than A Leaky Thing

Grrrr! Two afternoons pretty much wasted down in the van. I decided that I needed to get the slow sand filter system in and running as we were expecting rain and it would be a shame to waste it.

With a little hassle with delivery, I finally got all my guttering together and have fitted it to the van body. I'm not necessarily collecting water off the roof yet. If I decide to do that, I need to think about flashing the roof to the gutter. Right now, the gutter itself is my rainwater collector. With 18m of length and a width of about 114mm, that equates to a surface harvesting area of just over 2 square metres of collector - Enough to be getting on with.

I dragged the sand filter from the Toy Shed up to the van body, and with some heaving and grunting and lumps behind the ears, I got it located and set into position. A few modifications to change right handed to left handed plumbing and I was ready for a wet test.


Slow filter on the left - water tank on the right. From top to bottom, inlet pipe carrying rainwater in from gutter, overflow pipe for filter barrel and weir pipe (filter outlet to tank inlet).

It rained on Thursday, but not enough to get things rolling at any speed, so I hurried things along with a hosepipe. Stood on a stepladder outside, I could hear the water running into the tank through the guttering takeoff, and all seemed to be going well. Then, to  my dismay, I heard the unmistakable sound of water dripping onto the phenolic ply floor. Not good.

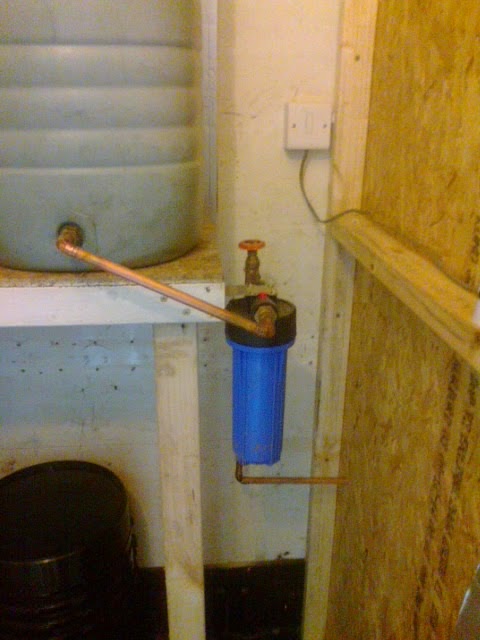
The collector pipe union with the outlet at the bottom of the filter butt was leaking like a leaky thing...so fast that the height of the water in the filter wasn't going up much. By the time the level reached the top of the weir pipe and started filling the clearwell tank, I figured I would have about 40 litres sloshing around on the loo floor. Despite my attempts to weld the union to the butt, I couldn't slow the leak down enough to conclude any testing, so I decided to drain the whole lot back out again (the tap on the side of the filter is there for that reason).

There is clearly some leakage involved with the water butts. My initial testing was carried out outdoors back in 2013 and a few leaks made no odds. Indoors, in the dry, this is going to be a real problem, so time to rethink the filter system. I think I can get away with the clearwell (storage tank). There is the slightest of weep around the copper tank connector, but nothing major to worry about.

Plan B, after a bit of discussion with Eco on the subject, is to make a thinner cylindrical filter out of PVC soil pipe and some solvent weld components and give that a go. There are two advantages to going down that road. Firstly, the filter unit is still about 1m tall (it's the height, not the volume that governs the working 'head pressure') but is only 110mm diameter so contains less gravel, sand and water. This makes for a much less heavy unit, and one that can be maintained much easier. Secondly, by using flexy couplings, it is possible to make the unit like a 'cartridge', so at end of run (3-6 months or so), the filter unit can be swapped for another and the first one taken down for maintenance and cleaning. If tests on the new Mk 2 system go according to plan, then I'm going to make a couple of spare units to allow for 'one on, one off and one in the wash'. Simples.

It may even be possible to double up the filter units, to increase the available water harvest if necessary. Two identical filter units running in parallel means the volume of water filtered is doubled.

Another advantage to using a much smaller diameter filter is that the working height will increase significantly for a much smaller volume of inlet water. In order to fill the butt filter from sand level to weir height the input volume needs to be some 60-70 litres. With a 110mm filter unit, the volume required is only 6 litres.

The new filter is made from a 110mm grey PVC soil pipe, a push fit access cap on the top end and a solvent weld blanking plug on the bottom. 21.5mm solvent-weld tank connectors will allow connection to the top and bottom of the filter housing using 3/4" nut flexy hoses (washing machine fill hoses). 


The lower outlet hose also becomes the weir pipe and will be connected to the threaded part of the tank connector on the clearwell. In order to carry out maintenance, this hose can be detatched from the clearwell inlet and drained into a bucket before the filter is then removed. 


The inlet pipe will again be flexy, allowing the top of the filter to be disconnected. With a screw-on access cap, the filter can be inspected and wet-harrowed in situ, or removed for complete overhaul and backflush as necessary.


If tests prove successful, I may even modify the inlet pipework to allow two filters to be connected. These can be operated individually or in tandem if necessary with a pair of inline valves (appliance valves). An individual filter can then be taken out if need be, leaving the other in place.


The collector pipe is a 20cm length of 21.5mm solvent-weld overflow pipe, drilled with an array of 3mm holes. This is welded to the inside of the lower tank connector and remains in place in the lower tube. The gravel needs to cover this tube, plus a few cm, and then there is a 40cm layer of sand over this as the main filter construction. A 20cm water level over the active 'schmutzdeck' provides the supernatent water for the filter unit. Oxygenation should be provided by the aeration of the inlet water as it flows from the gutter. The misshapen grey 'lump' on the end of the collector pipe is the dimple cut off the access plug during fitting the inlet connector. It has been heat-welded to the collector pipe with a soldering iron to prevent any of the filter media clogging up the tube.

All in all, a much better scheme than the original system. Lighter, faster, more compact and easier to maintain. To be fair, the prototype proved the principle a couple of years ago, so no harm - no foul.


Thursday, 7 May 2015

Kitchen Progress

Cracking on a-pace now.


The copper pipework is now in place and soldered up for the feed (via the cartridge filter) to the kitchen sink. 

I did have an 'oh shit' moment today in the facilities. When I developed and trialled the slow sand filter in 2013, I obviously set it up in such a way that the filter unit was on the right and my clearwell was on the left. There was no real reason for this other than I was pumping water from the drainage ditch to the right of me and draining off clean water to the left of me.

In the van, the water will be coming in from the left hand side and exiting to the right. No problem...reverse the plumbing to the butts. The inlet and outlet are mirror image. The connectors are plastic overflow tank/cistern connectors. No worries. 

Until, revisiting my connections, I realised I couldn't loosen any of them off as I solvent-welded all the threads for added watertightness. Doh! New 21.5mm connectors and tube to be re-fettled to reverse the tankage. I also have a drain off tap for the supernatent water in the filter unit that might just be in completely the wrong place...


On a more positive note, I managed to frame the second partition wall using some 2" x 2" timber. Not only that but stuffed and mounted it, painted it and anchored it to the ceiling tie. All looking (bar the cladding on this side) like the final structural layout now.


A little trimming required to sit neatly around the cable conduits and the skirting and all securely screwed into position.


Just some final tweaking to do, but the kitchenette is almost finished. Tiling of the splashback, final seating of the sink, the siliconing and floor finish to be done, doors to fit and we're good to go. Note the 5 litre bottle of water for brewing up. The company teaboat that I take to and from Portishead is now earning it's keep in here.


Just ignore all the random tools. Kettle, sink, mini-fridge for the milk and coffee makings are all in place and brewing up is happening. If I drink too much coffee, on the job, the loo is just next door. 


Thursday, 30 April 2015

Cabinet Reshuffle

Well, I got home on Tuesday after a day down at the van to find that my Ebay kitchen units had arrived. Today, I loaded them in Pudgy and took them down.

For cheap 'trade' units, they aren't too bad at all. Very solid, decent 18mm board all round and 18mm backboard on the base units and 8mm backboard on the wall units. Much better than the hardboard jobbies you normally associate with the price point.

They assembled well, and the finish was more than good enough. I'd be happy using these in my own kitchen if I ever need to go down that road!


Suprisingly (or not) everything went together in no time at all. In fact I had only planned to assemble the units today and hadn't actually given any thought to fitting them, but I managed to assemble everything, hang the wall units and pretty much locate the two base cabinets. With time on my hands, I retrieved my old kitchen sink (formerly installed in my old kitchen in Surrey and then transplanted to Retrotecchie's Toolshed at the bottom of the garden) which I brought up with all my gubbins in 2013. It needs a bit of a clean, but I dug out the jigsaw (note to self: buy new blades!) and cut the worktop and dropped the sink into place. Obviously not plumbed in or fitted properly yet, but the general setup is looking as planned.

Amazingly, the toilet/kitchen wall is squarer than a square thing and the worktop end fits beautifully with no gaps or ripples. No need for major silicone work...chuffed. Not only that, but the fit between the rear of the worktop and the side wall of the van is pretty much perfect too. As part of the final installation of the worktop (it is just loose laid on the cabinets until the plumbing has been done), I'll mark the edge of the worktop and drill a series of holes through the side walls and anchor into the worktop itself with 60mm chipboard screws after laying a bead of low modulus mastic. This will ensure that the flexing in the side of the van is reduced to an absolute minimum and will further rigidise the whole setup. 


Wall units fitted into place 600mm above the worktop. This is a little higher than the minimum of 500mm reguired for clearance to a hob, but allows the depth of my Camping Gaz stove should I decide to use that in the kitchenette. Ultimately, the gap between the worktop and wall cupboards will get a tiled splashback to about 450mm or so and then a lick of paint on the wall board to finish it off nicely. You can see the worktop is nicely following the lower lashing strap screwholes. The sockets just underneath the 500m wall unit are nicely placed for the kettle and/or toaster. I may finish off with a pelmet and some LED over-counter lighting, but that's a nicety and not on the agenda right now.

Don't worry...those units aren't skewed! It's just the oddball perspective of the phone camera. Honest!

There is a nice service gap behind the base units. Hopefully I can fiddle the plumbing into the sink unit without too much hassle and end up with a nice tidy job.


While the last of the installation is taking place (plinth, plumbing, worktop, etc.) and before I procure some cupboard doors (not supplied with the carcasses) I finally have a surface I can use for charging the drill battery and somewhere out of the way, other than the floor, to keep my in-use tools handy.

With the structural work completed for the toilet and the kitchen now generally in place, the final look and feel of the office is beginning to take shape.

To do: Adjust legs to allow for plinth fitting, align and drill for worktop, fit water feed pipe to kitchen taps, fit a trap and waste pipe and then screw everything into it's final position.

Yay! Serious progress.


Wednesday, 29 April 2015

Kitchenette Begins!

With the toilet/water tank facilities now finished (apart from final trimming and decor) it's time to turn my attention to the kitchenette.

I'm just not going down the road of explaining the hassle and heartache I've had trying to source my kitchen components from this side of the Cambrians. Let's just say that Wickes in Bristol would have supplied my materials weeks ago had the price and timing been right!

Kitchen units have duly arrived from an Ebay seller (they are stacked in my hallway for the moment) and I managed to procure a 2m length of 'Mouse Dust' (the colour scheme, hopefully not the quality!) 28mm worktop from Homebase in Brecon. This was £35...£5 more expensive than the 'Dapple Slate Grey' offering from Wickes. A huge saving though, as Brecon is a 70 mile round trip from here, and Bristol is almost a 300 mile round trip. Wickes could deliver....but wanted £80!

So, I now have my four carcasses and my worktop.

As the kitchenette is butting up against the toilet, with the outer skin of the toilet wall being the left-hand kitchen wall, I needed to do something to the OSB board to render it a little less, er, rough. In fact, agricultural would have been a better description for the finish. Much research seemed to indicate that the optimum (and possibly cheapest) solution was a decent wood primer, followed by a couple of coats of finely textured masonry paint.

I slapped on some primer with a brush and allowed it to dry thoroughly for 48 hours. At the same time, I also applied primer to the bare woodwork of the door lining.

In the workshop at home I'd already test-painted a sample of rough OSB with primer, and could test my chosen surface finish on that before committing to the final application.

At the same time as my worktop purchase in Homebase, I'd perused the Santex masonry paints. Most 2.5 litre pots seemed to be around the £18 mark, and a 5 litre  pot was £27-£29 or so. There were two tins on the shelf that grabbed my attention. Amongst all the other paints, these were marked on the shelf at £7.53. An odd price, and surely not right? I checked at Customer services, and was told that the price marked was indeed correct, but the two pots in question were 'discontinued' colours and had been marked down accordingly. Yes, I could have them at this special price, but if I wanted more of the same down the line, then no can do.

Fair enough. Colour was not an issue (particularly) and neither was needing more in a year's time. 5 litres at £7.53 was not to be sniffed at. 

An initial cutting in with a 2" brush around the edges and the corners, then a couple of roller coats had the desired affect. The colour, Ivory Cream, wasn't at all bad either!


As always, with a Nokia phone camera in certain lighting conditions, difficult to tell the colour. It looks white, but I can assure you it is a yellowy-cream!


This angle of shot shows the colour a little better. A few spots and roller spatters on the floor, but this will not matter once the floor is attended to. The jury is still out on non-slip floor paint or vinyl tiles.


Even the not quite butt edges on the OSB at the corner don't look too bad at all. This edge will be trimmed with a corner moulding for the final finish but for now I'm happy enough with the general effect. Skirting and ceiling trim finish will conceal any nasty edges once the kitchen has been installed.


Saturday, 18 April 2015

More palletwood creations


Blue tit nest box


Sparrow nest box


Robin or wren nest box


Salad planter

Coming Along

Loo nearly finished!


We now have a door and doorframe, plus electric light. Just the architrave and decoration to sort. With a second No 2 now accompanying the first one, I'm happy to report that it still smells fine.


Pallet Wood - 101 Uses


Pallet wood slats recovered from old pallets. Mostly 40" x 3.75" x .75"


Some used to make a small potting bench under the window in the garage.


I use old Ovaltine jars for nuts, bolts and screws, etc. Palletwood slats make a perfect shelving unit to store them on.


A couple of offcuts, and a piece of old broom-handle.


Window boxes for her indoors to plant herbs in.


A composting toilet for the Site Office!


And any real crap, offcuts or split bits plus all the 'cubes' from the corners make a nice stash of wood for the logburner!